If you are looking for How to Make Soy Sauce at Home, you are in the right place. This easy & clear diary will walk you through it all, step by step.
Soy sauce is a staple seasoning for most Asian cooking, as most of my cooking is Asian foods, I have to make sure I have soy sauce on hand, and a spare in my pantry. Ever since I stopped using fish sauce decades ago, I substituted soy sauce into any recipe with fish sauce.
Growing up in Thailand, soy sauce is no stranger to me. For years, I have been fascinated by the ways of people in the past made soy sauce. Everything looks so pure and calm with only natural ingredients and simple equipment, and nothing going to waste.
As I use soy sauce in my cooking daily, I started to think about making my own in that traditional way. The memories of knowing how traditional people made soy sauce came back and stuck in my mind. I couldn’t wait a day to start. However, to make sure I would do the right thing, I began with some serious research.
However, I only researched two different but fascinating methods. One is using wheat and the other one is without, and both have a long history of how people made them. During my research, I was so impressed to learn how expensive good soy sauce can be, and that made me want to make soy sauce this way even more!
I usually buy these 2 kinds from a store: the one with wheat is called Shoyu and the one without wheat is called Tamari. I know some friends who are sensitive to wheat prefer Tamari. The qualities of both are good for the prices, and they both made from organic soybeans.
The no-wheat method is used widely in Korea, and the ingredients are simple–just soybeans, salt, and water. The wheat method is known for making Japanese soy sauce. Besides soybeans, salt, and water, the secret ingredient for Japanese soy sauce that is hard to find is the yeast they use for fermentation.
I fell in love with both methods, and I even dreamed of fermenting my own soy in my back yard so I could use it and share it with my family. To me, making soy sauce is like working on a piece of art–really!
I spent days comparing the 2 methods and decided to go with the Korean one as it’s simpler. To my surprise, I couldn’t find any blog or youtube video that shows how to make soy sauce at home from start to finish. However, I found 2 videos that I really enjoyed. One is called “The Taste of Wisdom / Soy sauce passed down for generations” and the other one is form a website called Maangchi.
“The taste of Wisdom” video makes me want to do exactly what they do and use: the well water, the bamboo salt, the giant mortar & pestle, the way they use straws to tie the bean blocks and hang them, the field of earthenware etc. everything about it gives me a peaceful feeling. However, for some reason, they didn’t show how to separate the bean blocks and the sauce.
Maangchi’s method is more practical for making it at home, but the main point of this video is to show how to make a bean paste. The instructions were very clear and easy to follow, but
I had to adjust the recipe to make a smaller batch. As for the equipment, I had to improvise and simplify. The main equipment for making Korean soy sauce is earthenware crocks. They are a little pricey and very heavy, and since I wasn’t sure if I could get enough uses out of them, I decided not to buy one.
Despite the simple ingredients, there is so much work in making soy sauce. The process can take anywhere from 10 months to longer. “Do I want to do this?” I asked myself and spent a few days thinking. “ Yes, I really want to do it” was the final answer.
I combined what I learned from the 2 videos, and started to create my own. Instead of the earthenware crocks, I just made mine in one-gallon glass jars. They worked fine for my experimental process!
I started preparing the process in November 2017, and started working on it December 5, 2017. My plan was to finish everything in one year.
As you can imagine, so many things can happen in a year: a baby can be born within 9 months, seasons can change 4 times etc. In my case, without knowing when I started the soy sauce diary–we decided to move across the country!
In April 2018, while I was getting the house ready for sale, the soy sauce was in the process of fermentation in its jars. Then I strained and separated the bean paste in June 2018. By mid-July 2018, we moved from Oregon to Massachusettes, and yes, I brought my soy sauce along with us.
Before I separated the bean paste and the sauce, I was excited and dreamed of having a lot of homemade soy sauce. Unfortunately, I had too much mold in the bean paste and decided to compost it instead. That part failed.
After moving and settling in, I kept the soy sauce in the pantry to age.
In late January, I tasted it and was so happy with the result. The taste was priceless, it’s so good and its fragrance is perfect.
However, I have to admit that making my own soy sauce at home takes too much effort and work, and I don’t think I’ll do it again soon, but I’m very happy I did it this time at least.
Ready to get some inspiration? Here’s How to Make Soy Sauce at Home!
Ingredients & Equipment
Simple ingredients
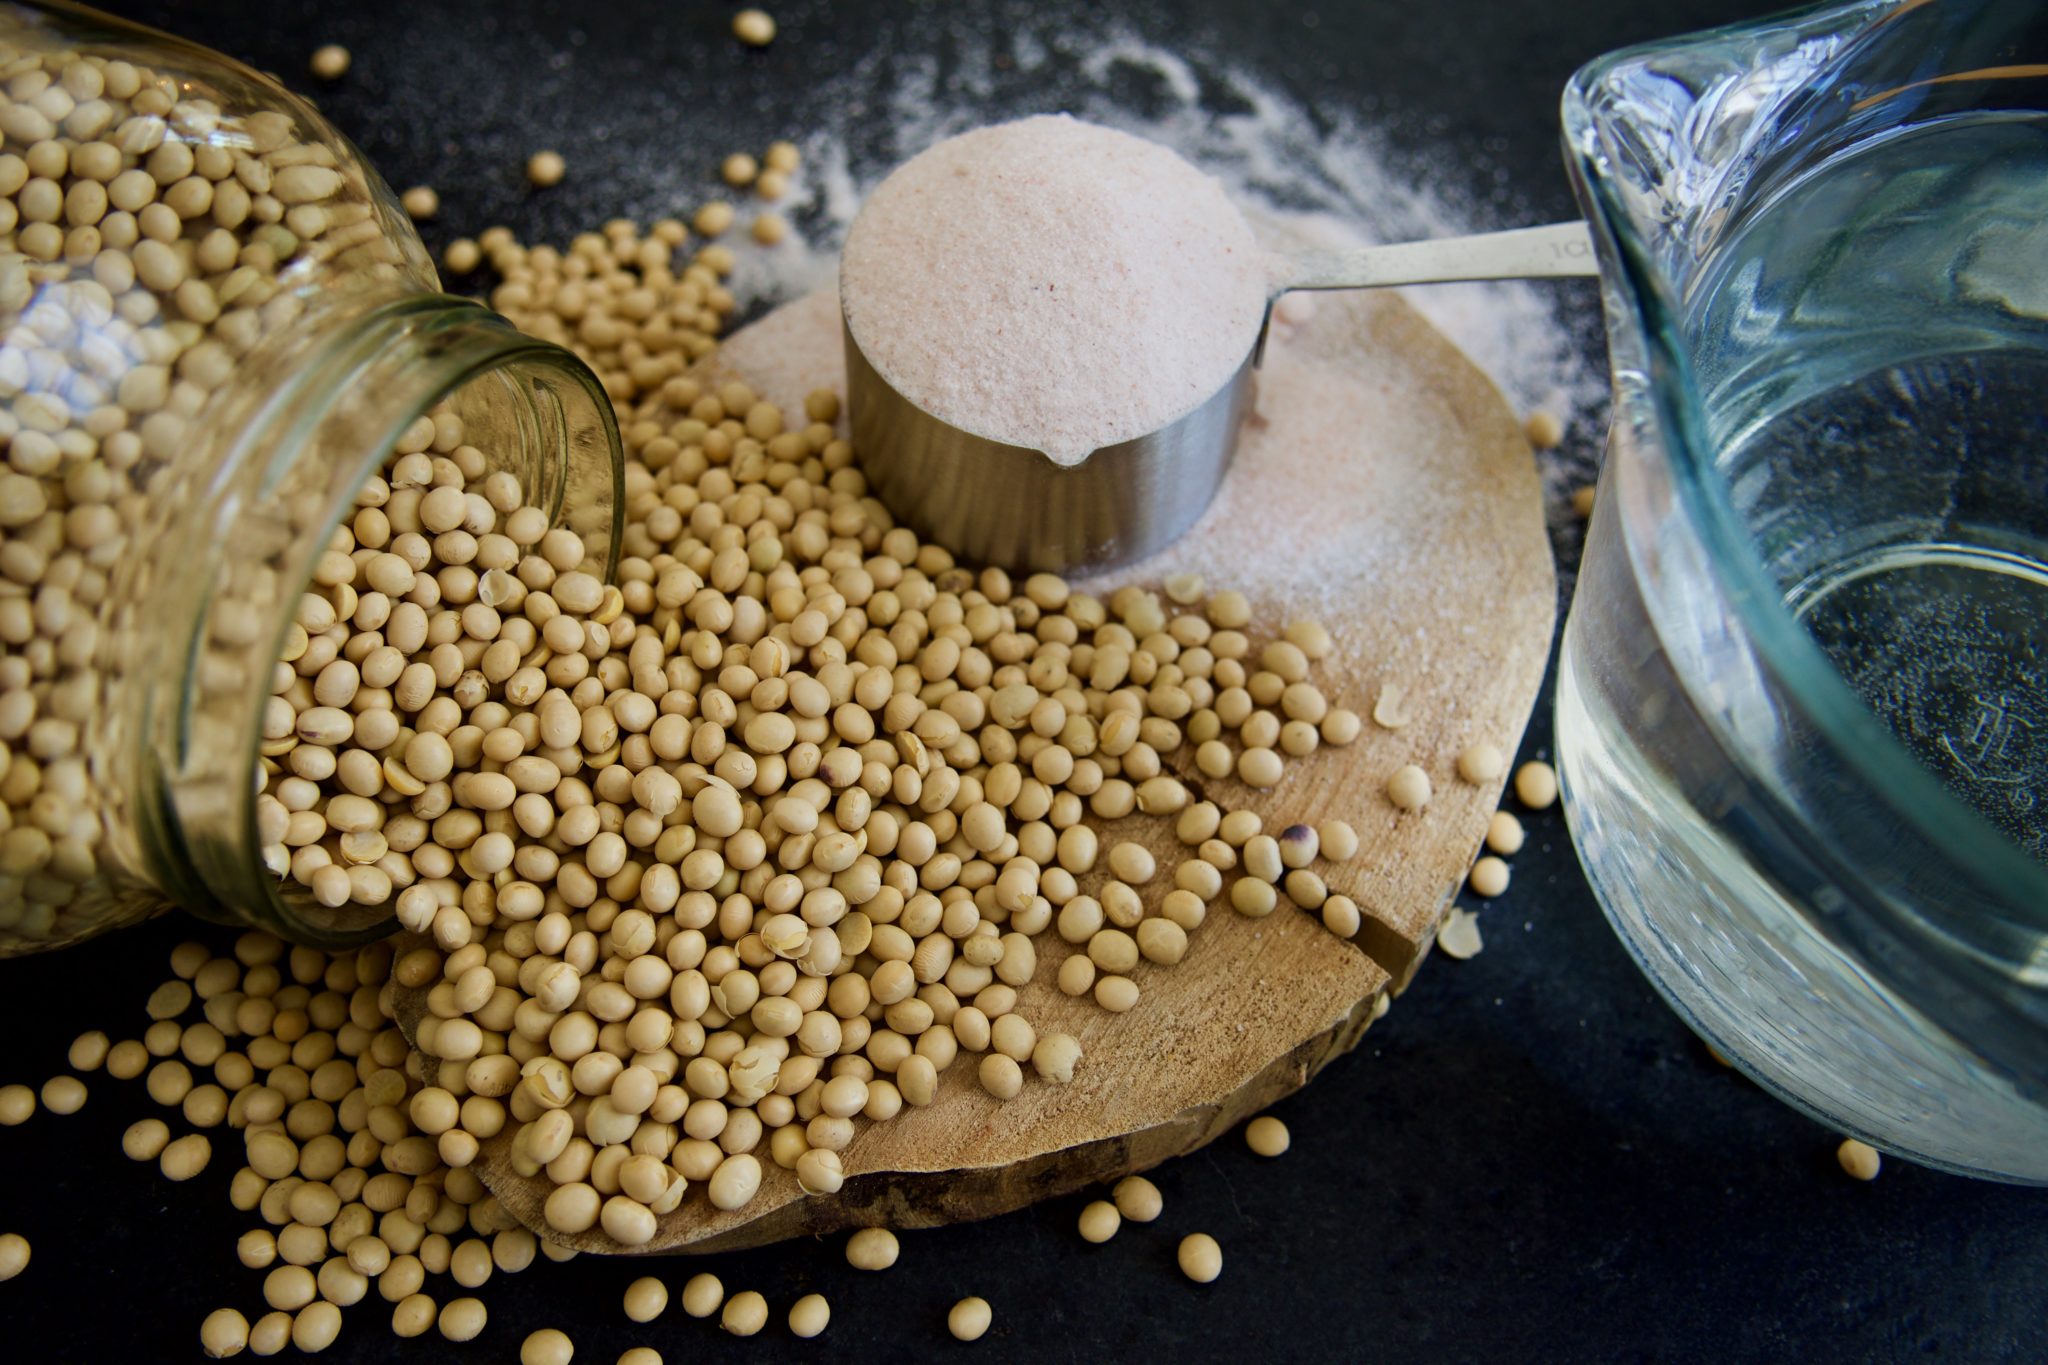
- 6 cups (1,200 g) of soybeans
- 4 cups (800 g) of good salt, I use Himalayan pink salt
- Filtered water. From what I learned, spring water is best, but I just use filtered water as I didn’t want to buy spring water in plastic bottles. Are you with me?
- A few small pieces of charcoal, dried Korean chilies, and dried Jujubes (Korean fruit)
- 1 raw egg for testing the ratio of salt water
- 16 cups (128 fl) of luke-warm filtered water
- About 12 cups (96 fl) or so of filtered water for cooking the beans, plus about 12 cups (96 fl) or more for soaking the beans
- 2 two-gallon glass jars
- Cheesecloth
- Some string for hanging the bean blocks.
- Courage, time, patience and a good vibe!
Instructions:
The diary of How to Make Soy Sauce at Home from start to finish
- December 5, 2017. Start soaking the beans; pick and discard the bad ones, wash and rinse them thoroughly. Cover them with filtered water and soak overnight.
- Decem 6, 2017, dump the soak water and rinse the beans very well, and re-cover with filtered water.
- Cook on medium heat until it reaches a boil. Turn the heat down and simmer until the beans are soft and the water has evaporated. Note: If the water gets too low before the beans are done, just add a little bit. This step can take a few hours.
- Strain the beans to get rid of excess water, and let the beans cool.
- When the beans are cool, smash them with a mortar & pestle or a food processor. I started it out pounding them and realized it was too difficult.
- Divide the paste into 4 portions, and shape them into 4 blocks.
- Lay them on a something flat. I have a clay cookie sheet that is perfect to absorb moisture from the beans, but I think a regular cookie sheet lined with parchment paper should work fine too.
- Put them near a heater to dry.
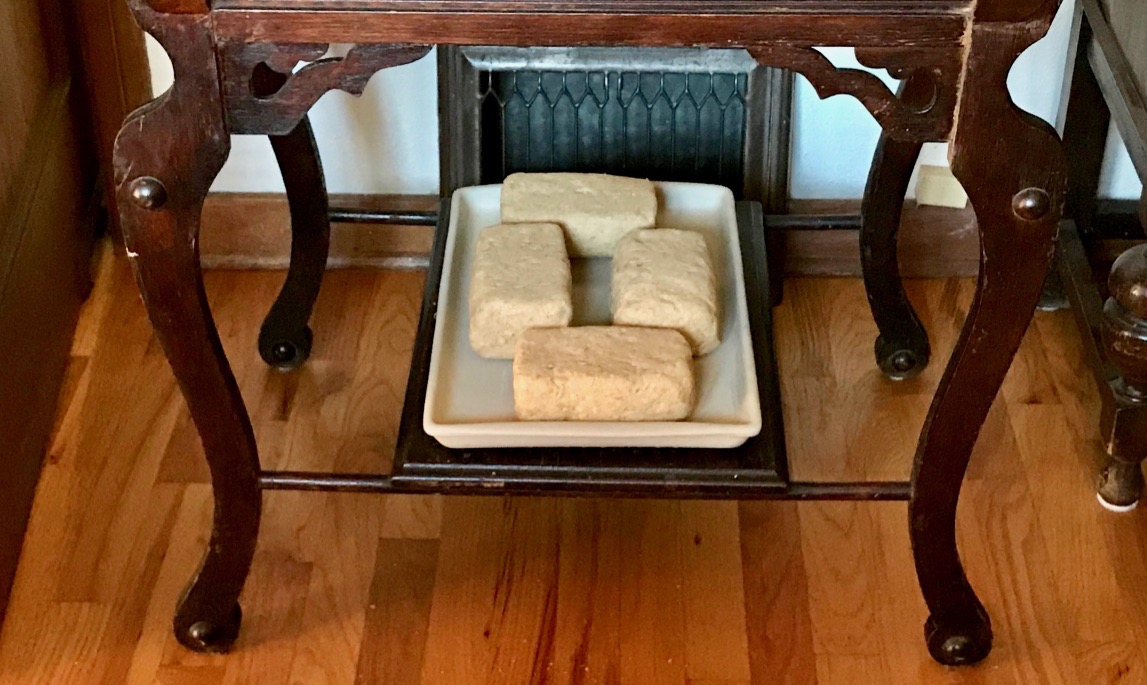
dry them by a heater
- December 9, 2017. Turn them over and keep drying the other side.
- December 11, 2017. The blocks are dried with some fungi. They say the fungi is normal as it’s part of the process to help with fermentation.
- Tie a string around them and hang them somewhere out of the way so they can continue to dry the inside. Make sure they have room between each block so they all can dry thoroughly. I hung mine on the window above the kitchen sink.
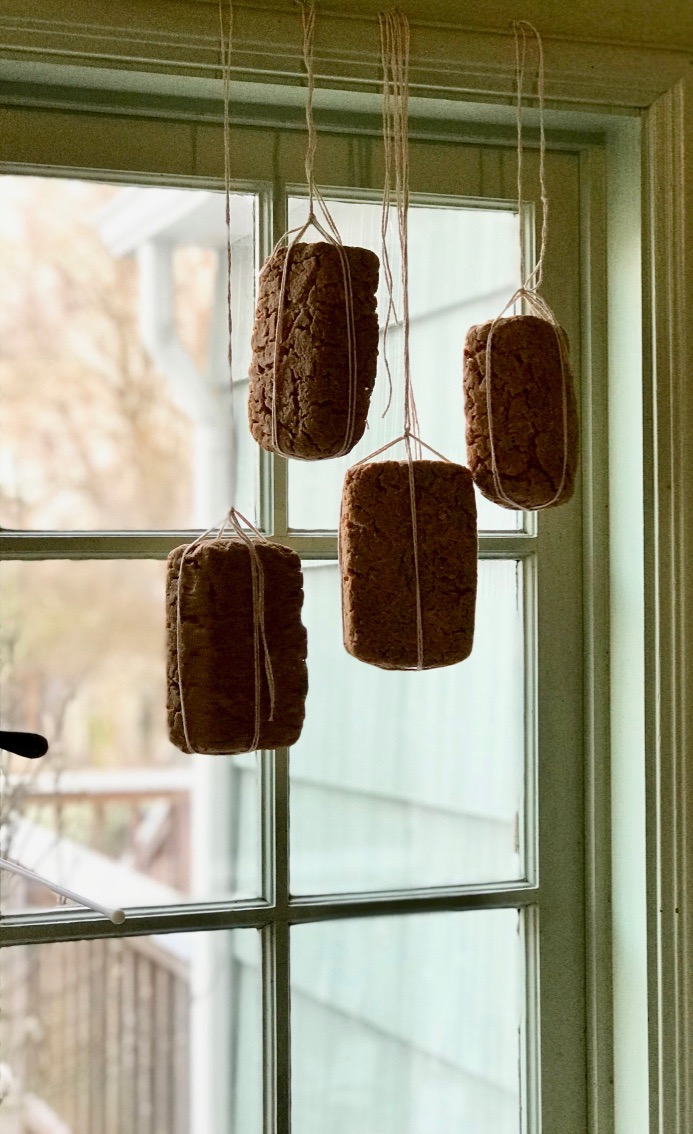
find a place to hang them to dry
- January 15, 2018. The blocks are completely dried and turned hard but feel much lighter. There is a lot of fungi growing, and they smell very earthy.
- Take them down. Gently scrub the fungi under the running water, and drain them on a strainer or drain rack. Transfer them to something breathable such as a basket, and dry them near a heater.
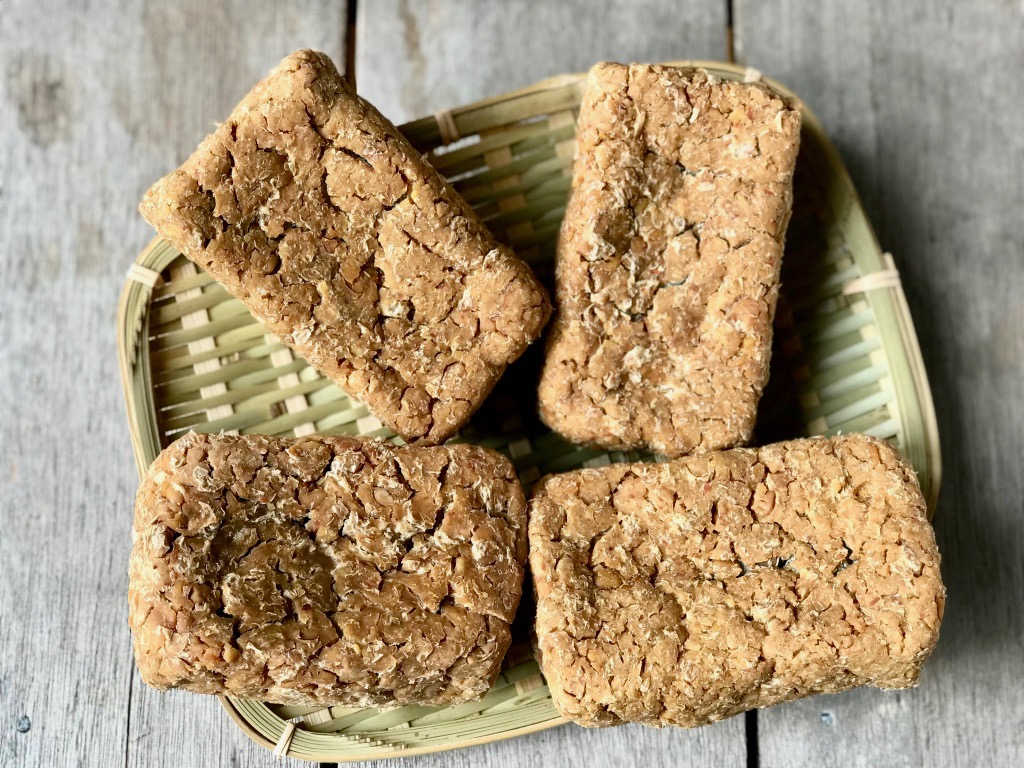
the blocks are ready
- January 16, 2018. The blocks are dry and ready. Prepare the brine in the gallon jars; mix luke-warm water with salt, and let the salt dissolve completely. While waiting for the salt to dissolve, wash and prepare a few pieces of charcoal, chilies, and jujubes and get them ready.
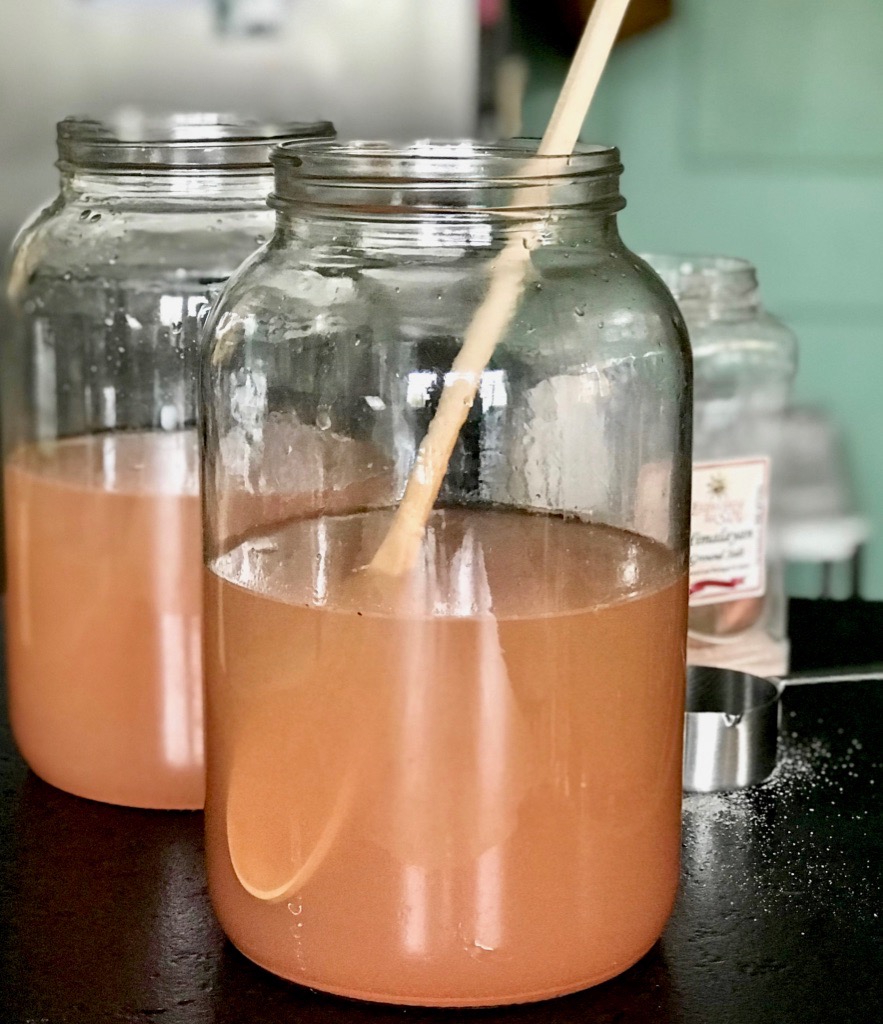
salt water brine
- When the salt has dissolved, test if the ratio of salt and water is perfect by dropping an egg in, if the egg floats, it means the salinity is adequate. Drop 2 bean blocks in each jar and top with the charcoal, chilies, and jujubes. As the blocks are dried, they float. Try to submerge them as much as you can even though it’s not easy. Cover the jars with cheesecloth.
- Put them somewhere to ferment for a few months. On some sunny days, uncover and let them enjoy some sun.
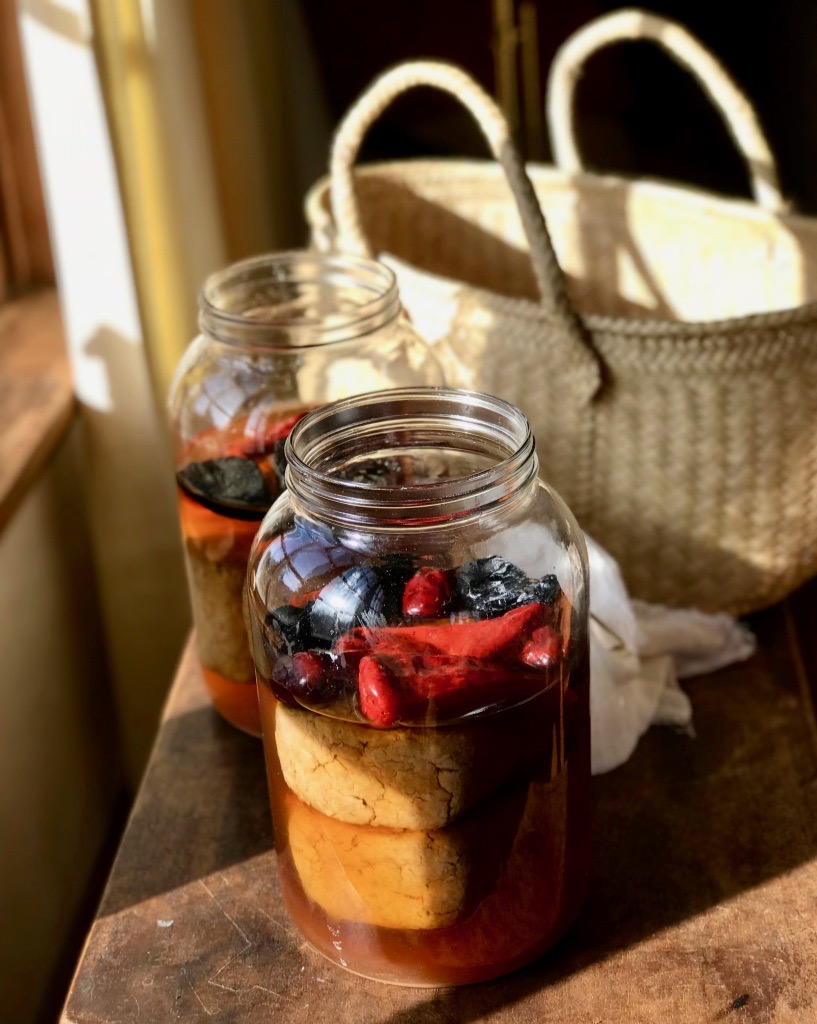
let it enjoy the sun on some sunny days
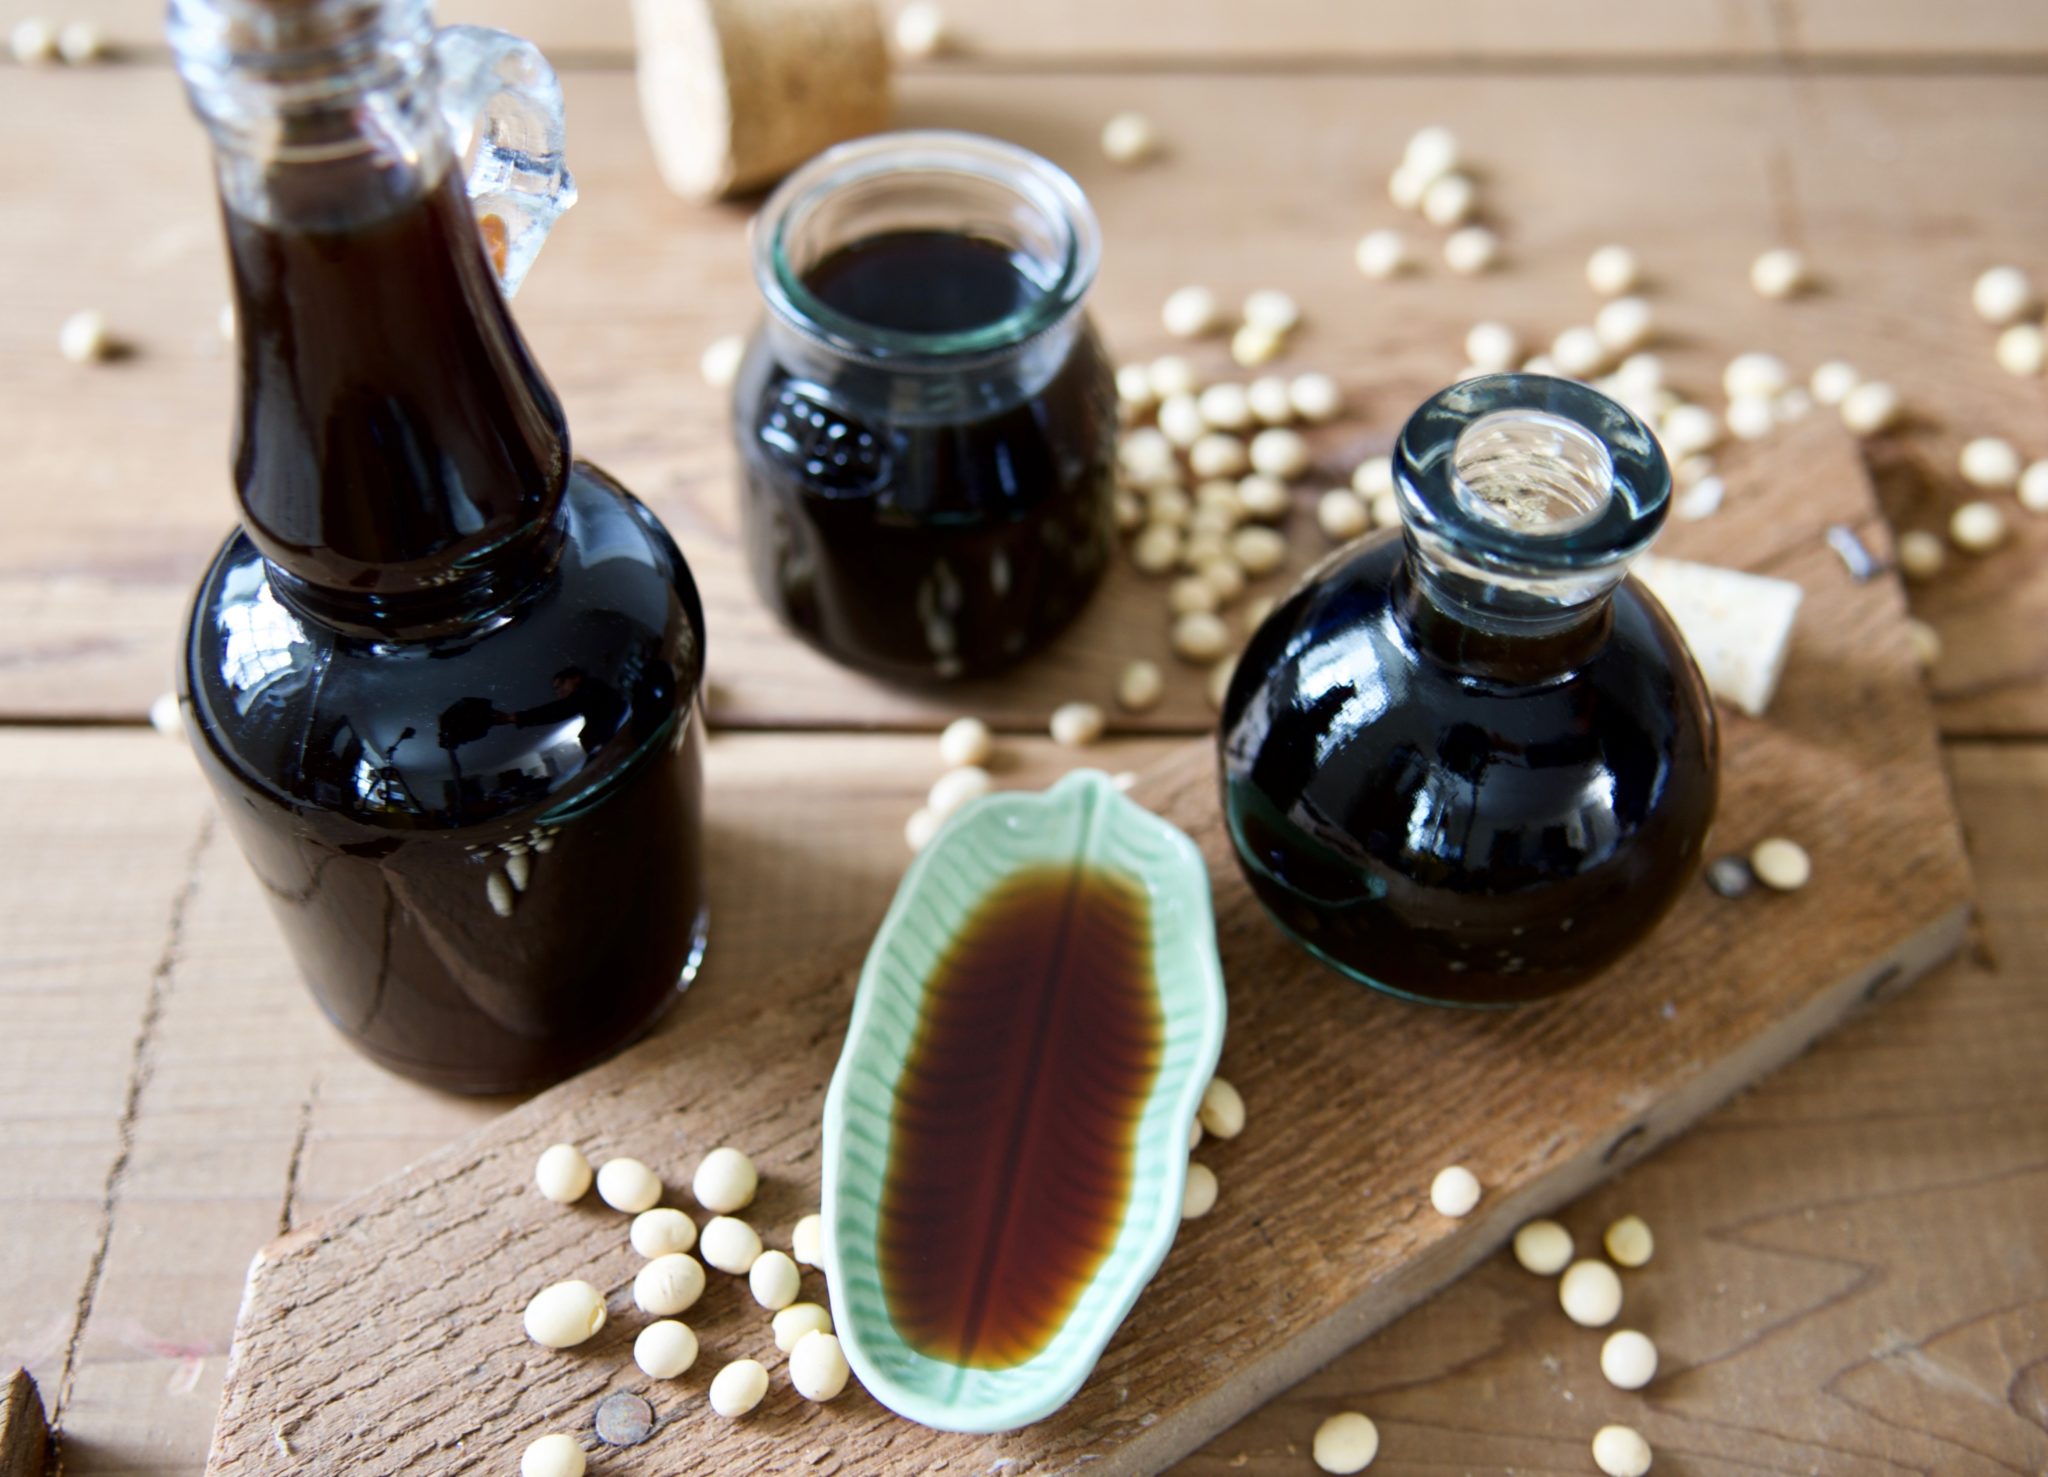
- June 15, 2018. Five months of fermenting, the pink brine has turned into dark-amber soy sauce. It’s time to separate them: discard the charcoal, chilies, jujubes, and fungi. Save the bean paste on a plate. Now the blocks have broken and turned into a paste. Strain the sauce, and cook on medium heat until it boils, and let it cool.
- While waiting for the sauce to cool, take a look at the paste. From what I learned from Maangchi, this paste is going to be fermented and used as soybean paste (Miso). However, mine has too much mold in it and I didn’t feel comfortable keeping it. Sadly, I had to compost it.
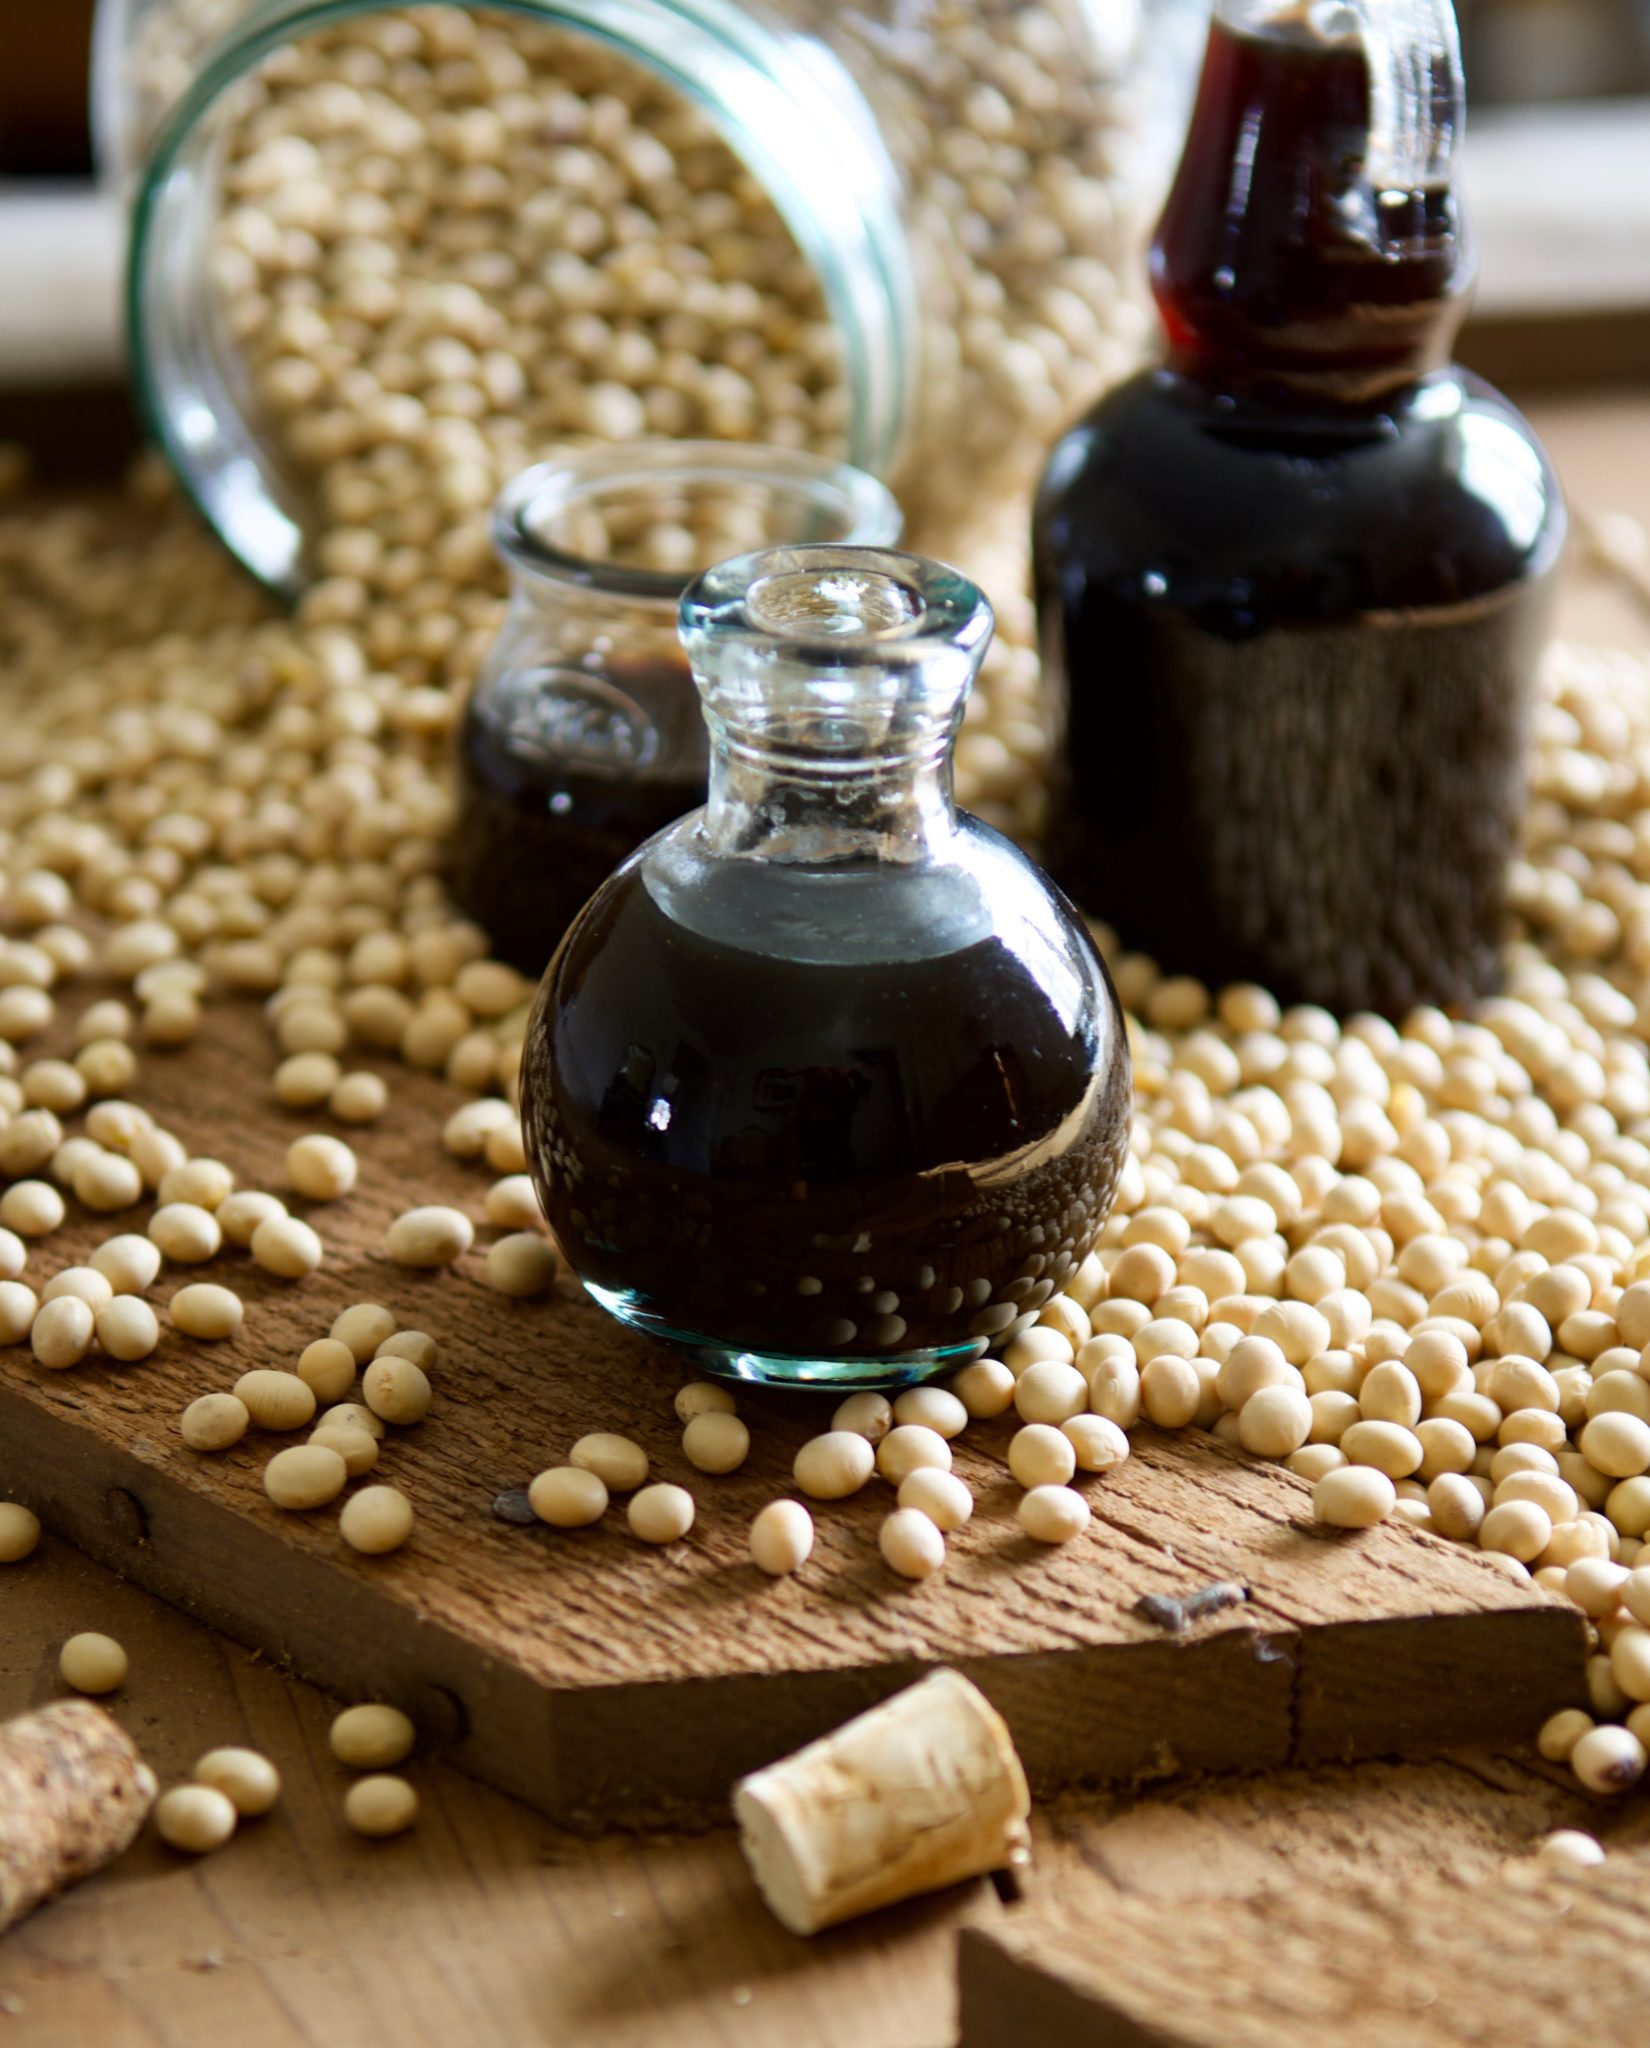
- The sauce is cool now. Put it into a small glass jar to age.
- January 28, 2019. Taste the sauce. It’s so delicious and ready to be eaten. I pour some into a few smaller glass jars that are easier to use. It looks so beautiful and precious, so I only use it as a dipping sauce as it tastes too good to use it for cooking.
enjoy!
That’s the end of the Diary. I hope you enjoy reading and watching the video as much as I do sharing it. Please share with how yours turns out if you make it, I’d like to hear about it from you!
Hello Ma’am, this is Souvik from India.
The first problem I faced is consolidating the bean-paste. It was just breaking apart. So I wrapped it with cotton cloth & then consolidated. After that it was easy to consolidate and shape.
One interesting information for you. Earthen pots are plenty available at my locality cheap in price too. So I’m going for a little more traditional way.
Bonjour (from Montreal, Canada)
today is January 5 and I’m starting my soya sauce process. Do you have info for the miso. I would you have done it if it hadn’t been filled with mold? And what does it look like (the mold in the paste) green, yellow-ish?
tank you
Do you have a recipe for fish sauce? Just found your site today and love it even though I’m not vegetarian 😉
Thanks for your kind words. I don’t have a recipe for fish sauce, but I have been developing a vegetarian version of fish sauce for a while. It’s almost to the point that I’m happy, and hopefully I can share it soon!
Hi, your video was one of the most pleasant videos to watch on YouTube. I never knew how Soy sauce was made.
I would try this myself, but at the moment I am not in a place where I can make. Maybe some day when I move.
My question is ‘How little salt can you use to make this recipe for the amount of sauce you made?’ I ask this because
my Dr. has told me to reduce my salt intake to almost nothing. This leaves just about any store bought Soy sauce off limits to me. Even the reduced salt Soy sauces have way too much salt in them. So how little salt can you use to make this recipe, or is there a good Soy sauce alternative?
Thank you so much for the wonderful video, and I will be looking forward to your answer.
Thank you so much for your kind words. Salt is an important part of making soy sauce. To be sure it’s safe from bad bacteria, it has to have enough salt to make an egg float. However, the actual taste of the finish product is not too salty at all with my recipe as I used the minimum amount of salt I possibly could to make the egg float. I understand about your doctor’s concern, and also understand that it’s not easy to cut all the salt out of our diet. What I do with my daughter to make sure she doesn’t eat too much soy sauce is that I dilute it with vegetable broth. It still tastes good, but it’s definitely still has salt in it. I’ve been working on fish sauce & soy sauce alternatives, and hopefully they will turn out good. However, there is also salt in these, but much less. Please check back, and thank you again!
Hi! Thank you so much for sharing your experience. It makes me want to make my own. May I ask where did you buy the charcoal from? Thank you!!
You’re very welcome. I was fascinated by the process I learned and really wanted to make it. I wasn’t sure if I wanted to share but after I got everything done, I felt like I should share it. It was a great experience. I’m glad there are a lot of people appreciate my work. I bought the charcoal from a hardware store near where I live. It was a bit hard to find it during the time I made the soy sauce (January).
Hi! thanks for the testing and the effort to put it online! I’ve tried to do Soy sauce the japanese way, because the Bacillus subtilis in the korean version made me feel like it was going to have a very different taste than the store bought soy-sauce. In the end it got way to hot during the solid phase fermentation, and had a very weird smell after the liquid phase fermentation, so I didn’t went to the end. I was wondering what does it smells and taste like after the fermentation and during the aging? Very curious as I want to try again this winter, it was my mistake to try to do the solid phase during a hot spring, and it is why it didn’t work. It makes you work with the season, just like wine!
I have never done the Japanese way before, but I’m researching it though (stay tuned!) The one I made tastes so good, it’s fragrant and has nutty taste of the soybeans I use. I have saved a small jar to age and I’ll compare it when it turns 2 years. Thank you so much for sharing your experience.
Hello, your video about making soy souse is gourges! I enjoyed it!
I have a question for you. I live in Transylvania, and if I can’t get yuyuba is that all right if I yuse simple dates? or raisin is better? Maybe dried plums? Maybe apple chips made by myself, to be sure it has no presetvative?
Thank you for your answer.
From what I learned, Jujubes give a sweet taste to soy sauce. However, I don’t taste any sweet in mine, so I’m not sure if it’s necessary. If you can’t find them in your area, I’m sure you can do it without them. Please let me know how it turns out if you use one of those fruits you mentioned.
I am wondering why you discontinued using fish sauce.
Yes, I stopped using fish sauce when I became fully vegetarian. It forces you to look at many ingredients and start thinking of substitutions.
Really nice piece of writing and peaceful picture you created. Thank you.
Thank you very much–this was a long process, but I’ve learned a lot and look forward to doing it again.
Good day! What is the use of charcoal and dried fruit to the fermentation.
The charcoal help to purify the brine and the jujubes give a sweet taste to the soy sauce.
Your recipe is perfect for my vegan diet.
where can i purchase the charcoal ? can i purchase it online?
Can i get these at a Korean market:dried Korean chilies, and dried Jujubes? Can i purchase them any time of year?
how much to buy of all of the above?
with the amount of salt that is used, does this make the final sauce, a high salt content?
how much does this recipe make?
thank you for your help.
You can get everything besides charcoal from Asian stores. It doesn’t cost a lot to make it. The detailed recipe is already in my post. It does have a high salt content to prevent bad bacteria during the process, so if you do, please use it a little bit at a time.